Uno Platform Apps with Grial UI Kit

A powerful new feature in Uno Platform is .NET MAUI Embedding, which provides an easy way to incorporate Grial UI Kit into an Uno Platform application.
This is particularly useful when you want to leverage existing .NET MAUI controls like Grial UI Kit and avoid reinventing the wheel.
In this blog post, we'll guide you through getting started with Grial UI Kit and embedding Grial UI Kit controls into your Uno Platform projects.
Check Out the Sample
Before we get started, take a moment to explore an existing sample app by Uno Platform that showcases some of the fantastic controls offered by the Grial UI Kit.
You can find the sample here.
The demo app includes a variety of controls, such as:
- Area Chart
- Bar Chart
- Bar Multi Series
- Line Chart
- Pie Chart
Getting Started with Grial UI Kit
To integrate the Grial UI Kit controls into your project, you need to first follow these steps:
- Begin by signing up for the Grial UI Kit.
- After signing up, log in to the admin portal.
- Create a Grial App in the admin portal by entering the application's name.
- Go to the Download tab and select "Download Kickoff Solution." At this point, you'll be prompted to purchase a license, which is essential for using Grial.
.NET MAUI Embedding in Uno Platform Applications
.NET MAUI Embedding in an Uno Platform application can be started from scratch or added to an existing application.
This section will guide you through the necessary steps for both scenarios and provide the steps to integrate Grial UI Kit controls into your application.
Incorporating .NET MAUI Embedding in an Existing Uno Application
To add .NET MAUI Embedding to an existing Uno application, first create a new application using the uno App Template, enabling .NET MAUI Embedding.
Then, remove the target frameworks that .NET MAUI Embedding does not support from your projects.
After this, add the GrialLicense file and the Nuget.config file to your project and solution folder, respectively. Update the ApplicationTitle and ApplicationId properties in your project file with the values retrieved from the Grial app creation process.
Lastly, add a reference to the UXDivers.GrialMaui NuGet package to your project and update the UseMauiControls extension method in the AppBuilderExtensions class to call the GrialKit.Init and UseGrial methods.
Getting Started with .NET MAUI Embedding and Grial in a new Project
Step 1: Create Your Project
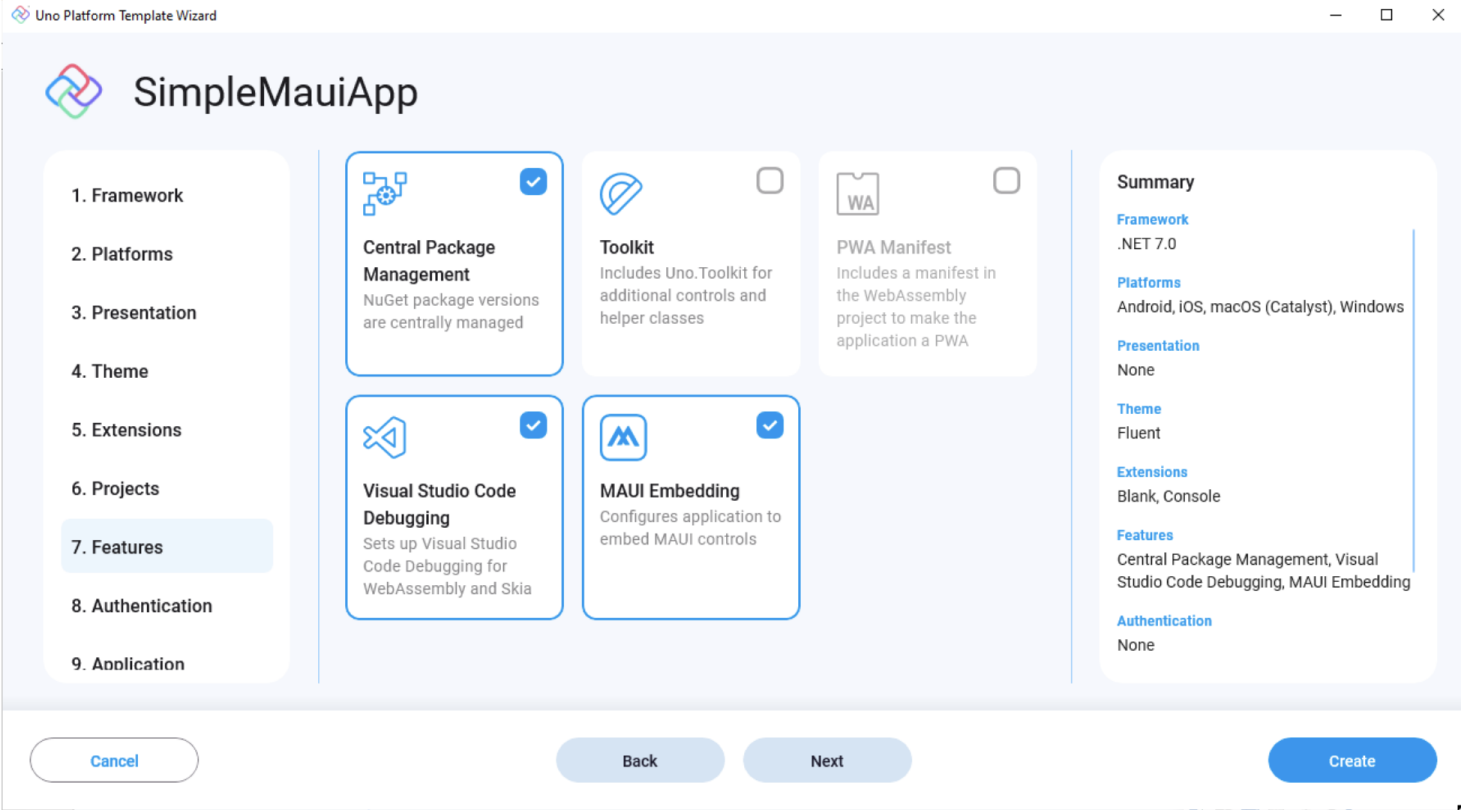
Creating a New Uno Application with Uno Platform Visual Studio Wizard
The Uno Platform Template Wizard for Visual Studio is the starting point for a new project. Choose either the Blank or Default template and click the Customize button. Ensure that only iOS, Android, and Windows platforms are selected as .NET MAUI Embedding is only supported on these platforms. (except MacCatalyst, which Grial does not support)
Next, under the Features section, include the .NET MAUI Embedding feature and click the Create button. This will create a .NET MAUI class library where third-party .NET MAUI control libraries can be referenced.
Step 2: Fine-Tune Your Project
Now that you've set the stage let's fine-tune your project for optimal performance and a polished look:
- Remove Unnecessary Target Frameworks: Trim down your project by removing the net7.0, net7.0-maccatalyst, and net7.0-windows10.0.19041.0 target frameworks from both the MauiEmbeddingApp and MauiEmbeddingApp.MauiControls projects.
- Streamline Mobile Development: In the MauiEmbeddingApp.Mobile project, remove the net7.0-maccatalyst target framework.
- Focus on Essentials: Lastly, remove MauiEmbeddingApp.Windows project in your solution.
Step 3: Embed the Grial Magic
- Integrate GrialLicense: Add the GrialLicense file to the MauiEmbeddingApp.MauiControls project as an EmbeddedResource. This step is crucial for unleashing the full potential of the Grial UI Kit in your application.
Step 4: Configure NuGet Credentials
To ensure smooth sailing with NuGet packages, follow these steps:
- Add NuGet Configuration: Integrate the Nuget.config file into the solution folder. This configuration file plays a pivotal role in managing NuGet package sources and credentials.
<!-- nuget.config -->
<configuration>
<packageSourceCredentials>
<UXDivers>
<add key="Username" value="[username]" /> <add key="ClearTextPassword" value="[password]" />
</UXDivers>
</packageSourceCredentials>
<packageSources>
<clear />
<add key="nuget.org" value="https://api.nuget.org/v3/index.json" />
<add key="UXDivers" value="https://nuget.uxdivers.com/grial" />
</packageSources>
</configuration>
- Profile Page Credentials: If you find yourself lacking credentials, fear not! Head over to the profile page in the admin portal. Click on the NuGet tab, where you can effortlessly create credentials for your account.
Step 5: Fine-Tune Your Project Files
Now, let's make sure your project files are aligned with your vision:
- Update Application Properties: In the csproj file of MauiEmbeddingApp.Mobile, infuse your application with personality. Update the ApplicationTitle and ApplicationId properties with the values retrieved earlier from the zip file.
- Customize Android Label: Navigate to the Main.Android.cs file within the MauiEmbeddingApp.Mobile project. Transform the Label property of the ApplicationAttribute from @string/ApplicationName to the ApplicationTitle you obtained earlier from the zip file.
[global::Android.App.ApplicationAttribute(Label="ApplicationTitle", Icon="@mipmap/iconapp", LargeHeap=true, HardwareAccelerated=true, Theme="@style/AppTheme")]
public class Application : Microsoft.UI.Xaml.NativeApplication
Step 6: Infuse Grial Magic
Time to add a touch of magic with Grial UI Kit:
- Add Grial NuGet Packages: In the MauiEmbeddingApp.MauiControls project introduces a reference to the UXDivers.GrialMaui NuGet packages.
- Enhance AppBuilderExtensions: Within the AppBuilderExtensions class, level up your application with Grial magic. Update the UseMauiControls extension method to invoke the GrialKit.Init and UseGrial methods.
public static MauiAppBuilder UseMauiControls(this MauiAppBuilder builder)
{
#if IOS
var theme = new ThemeColorsBase(new Dictionary<string, Color> { { "AccentColor", Color.FromArgb("#FF3F75FF") } });
GrialKit.Init(theme, "MauiEmbeddingApp.MauiControls.GrialLicense");
#else
GrialKit.Init("MauiEmbeddingApp.MauiControls.GrialLicense");
#endif
return builder
.UseGrial()
.ConfigureFonts(fonts =>
{
fonts.AddFont("MauiEmbeddingApp/Assets/Fonts/OpenSansRegular.ttf", "OpenSansRegular");
fonts.AddFont("MauiEmbeddingApp/Assets/Fonts/OpenSansSemibold.ttf", "OpenSansSemibold");
});
}
If you didn't yet, do yourself a favor and check Uno Platform latest release. Amazing stuff from the Uno Platform team. Congratulation guys!